
Since computing began to become popular in the mid-90s, we have encountered an associated obligation that we were not aware of: backups. Backups are the only method to avoid losing all information that we have stored both on a computer, as on a tablet or smartphone.
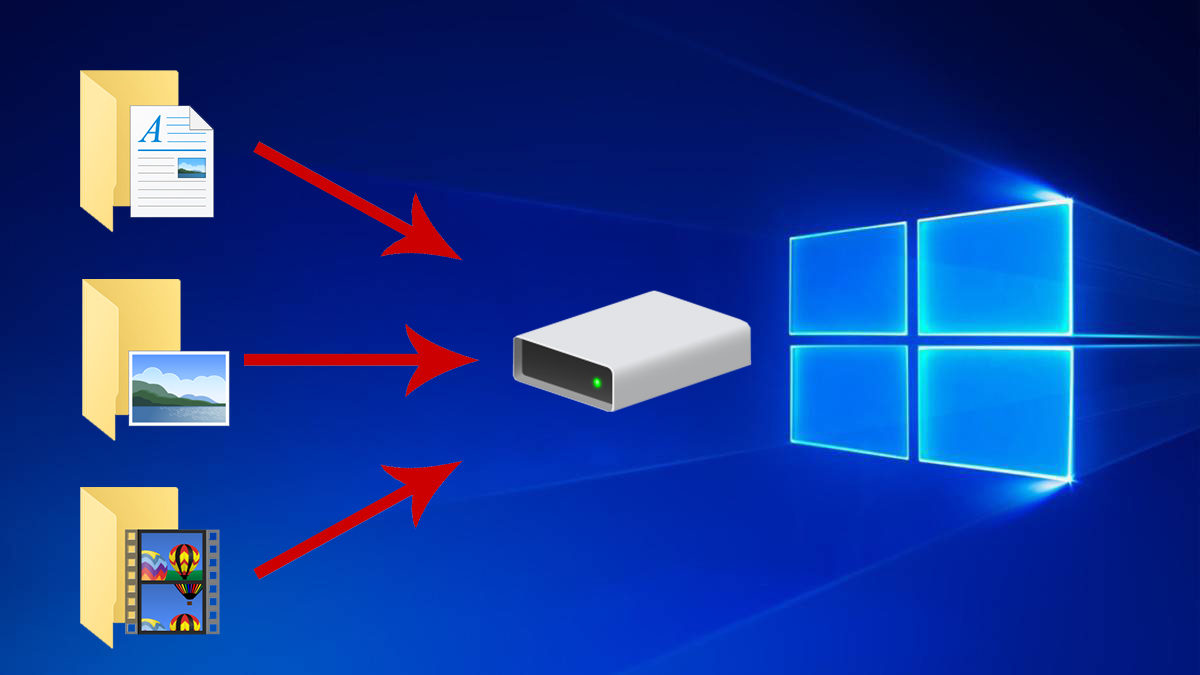
Cloud storage services have helped a lot in this work, a task that previously required connecting an external hard drive to the computer to make the backup. With smartphones this is not possible, so we must resort to other methods to make a copy of all the content on your mobile.
Despite the different attempts by Microsoft to enter the world of smartphones, unfortunately the fantastic idea (I am not saying it with mania) of offering Windows on mobile devices was unsuccessful, forcing her to completely abandon that idea and that both iOS and Android continue to share the market.
By offering a complete ecosystem of devices, Apple offers us different tools to make backup copies in a simple way on both the iPhone, the iPad or the iPod touch. In the case of Android, the thing is different, although being based on Android, it is Google itself who has been in charge of facilitating the possibility of making copies of the content of the device, as long as the device is managed by Google services.
With the US ban on Huawei, Google was forced to allow Android to be offered on its devices, so the method that we are going to show you to make backup copies on Google's Android (with Google services) not valid for Huawei devices without these services.
Reasons to back up
Restore the phone because it does not work as the first day, we have a high battery consumption and we have not found the solution, the phone has been stolen or we have lost, it has stopped working completely ... there are many random situations with which we can meet in the day to day that justify the time necessary to make a backup.
Backup on Android
Google Drive for data
To be able to use an Android smartphone, it is necessary, yes or yes, to have a Gmail account. Gmail accounts not only offer us the best mail service available today, but also offer us a series of associated services such as Google Photos, Google Drive, to name the best known and we can get the most out of them.
The backup that we can do natively through Android in Google Drive includes call history, contacts, text messages but not the photos and videos since that's what Google Photos takes care of. To make a backup of an Android smartphone in Google Drive, we must perform the following steps:
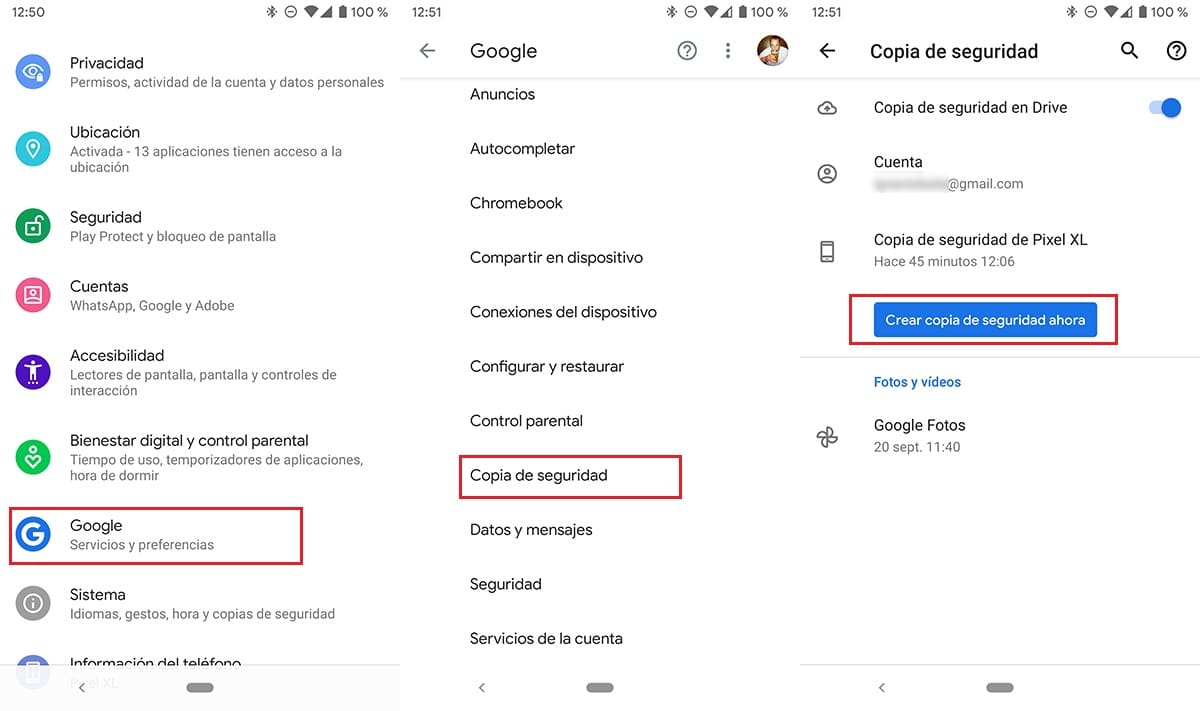
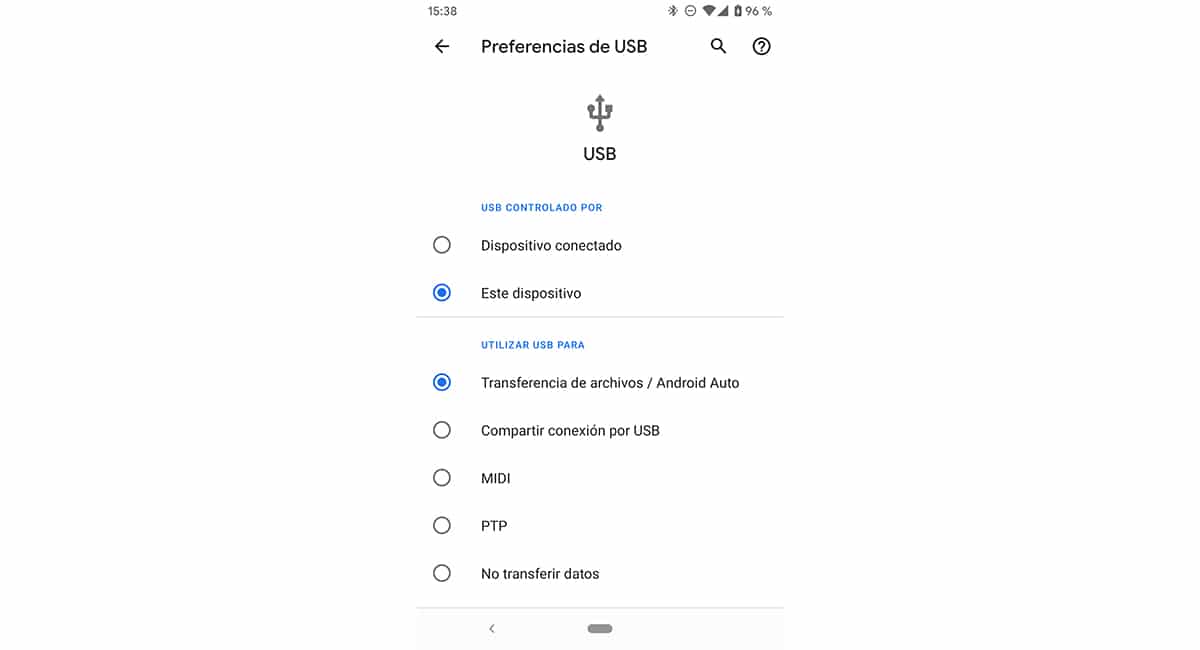
- The first thing to do is access the terminal settings through the application Settings.
- Within Settings click on Google to access the services offered by the search giant and among which is to make backup copies in Google Drive.
- Within the Google menu, click on Backup copy.
- If we have more than one account on the device, we must select account of which we want to make the copy.
- Finally we click on Create a backup now.
By not including the images and videos stored on the device, this process only takes a few seconds, minutes in the worst case, so it is not necessary to charge the device while we do the backup.
It is not necessary to have the Google Drive application installed on the computer, since we will not be able to access the backup data, since these are encrypted and without access from our account. Even so, if you want to download Google Drive on your computer to access the files that we have stored in the Google cloud, you can do it with the application that you can download through the following link.


Google Photos for photos and videos
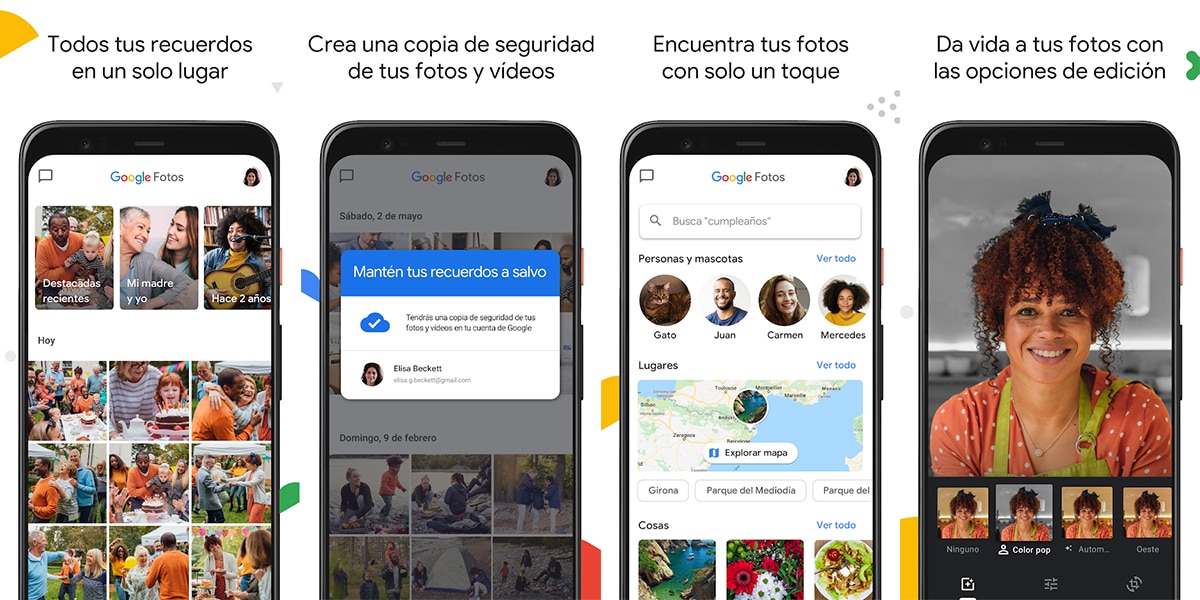
Most mobile phone users only care about the photos and videos they take on a daily basis, as they represent valuable memories for the future. If this is your case and the only thing that worries you is this type of content, you do not have to use Google Drive to make a copy of your computer, since with just Google Photos you can do it.
Google Photos stores all the photos and videos that we take from our device in high quality (it is not the same quality as the image or video of our device, but very similar) completely free and automatic. Every time we connect our device to the charger, the application is responsible for uploading all the new content to Google Photos.
Thanks to this application, we can access all content created with our device on any other device and computer through the browser.

Windows
If you are one of those who have not yet adapted to cloud storage services, you should do it now. If not, still there is another method to backup of your Android device, at least of the images and photographs, which is what is really important.
For backup Android to Windows, we must perform the steps that I detail below:
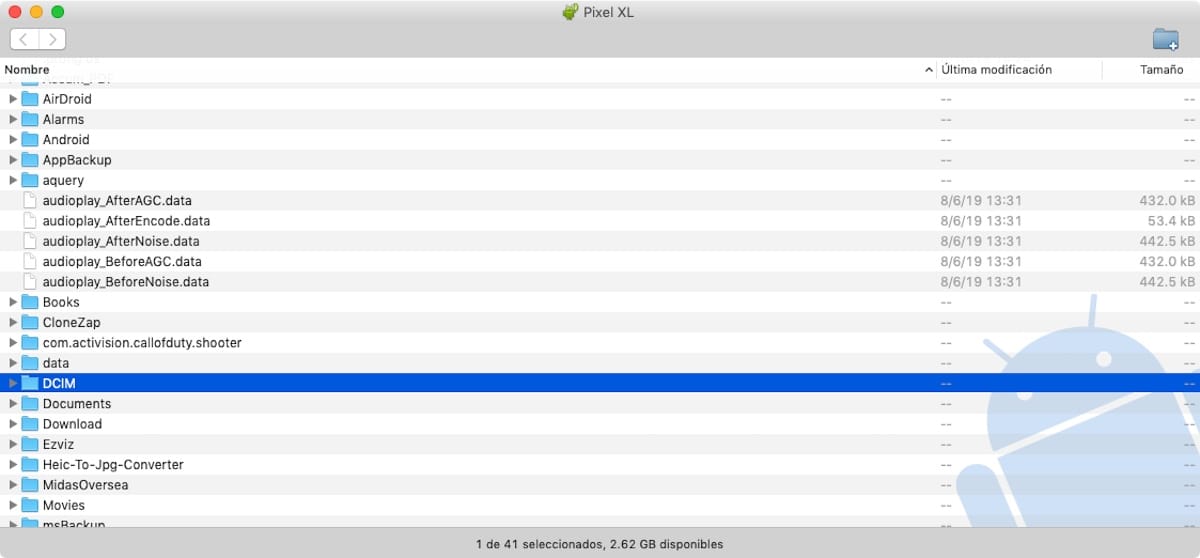
- Connect the smartphone to the PC by activating the function File transfer on the device.
- Next, we access the Windows File Explorer and access the storage unit representing new smartphone.
- Of all the folders shown, we just have to make a copy of the DCIM folder. All the images and videos that we make with the device are stored in this folder.
Mac
The process to make a backup copy of the images and photographs that we have on an Android smartphone from a Mac is the same as with Windows, since we only have to copy the DCIM folder of the device. In order to access the device, we must use the application Android File Transfer, an application that is nothing more than a file explorer very similar to Windows.
Backup on iOS
The operating system that Apple uses on its mobile devices is iOS, a completely different operating system from the one we can find on Android, so the methods for backing up they are completely different.
iCloud
iCloud is Apple's cloud storage service. This service offers all users 5 GB of free storage, more than enough space to store the most important data of our device (iPhone, iPad or iPod touch) but not to store the images and videos that we have on the device.
iCloud is activated by default, so we will always have a backup in the Apple cloud of our contacts, calendars, Safari bookmarks, notes, reminders, iCloud messages, passwords, data from the Health application ... It also stores photos and videos that we make from our device, as long as we have space greater than the 5 GB that it offers for free.
If not, we must deactivate the Photos in iCloud boxAs once the 5GB is full, there will be no space to store new content. From the device itself we can make backup copies of our iPhone. This data does not include the data that is stored in the Apple cloud just for activating this service, but only includes:
- Application data.
- Backups of Apple Watch as long as it is not Family Sharing.
- Device settings.
- Home screen and organization of apps (not the apps themselves).
What is not included in iCloud backups:
- Data stored in iCloud such as contacts, calendars, notes, messages, data from the Health application ...
- Data stored in other cloud services like Gmail
- Mail application data.
- Apple Pay information and settings.
- Touch ID and Face ID settings.
- ICloud Music Library and the App Store if it's still available on iTunes, Apple Books, or the App Store.
For enable iCloud backups We must follow the steps that I detail below:
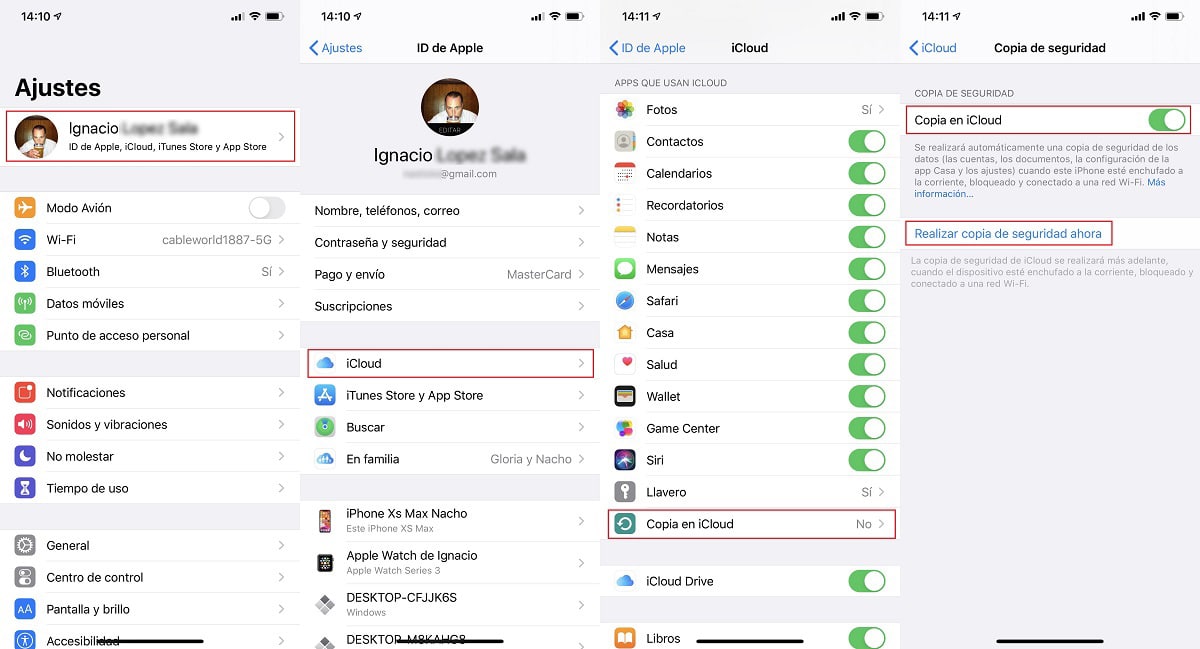
- Within Settings, click on our Apple ID.
- Next, click on iCloud.
- Within iCloud, all the data that is stored in iCloud automatically but which are not included in the backup.
- To activate the backup in iCloud, click on Copy to iCloud.
- Finally, we activate the Copy switch in iCloud and in Back up now.
Mac
If our computer is managed by macOS 10.14 or earlier, we must use the iTunes application. iTunes has always been the application for everything that Apple made available to users, and I say put, because with the launch of macOS 10.15, Apple separated all applications and iTunes ended up disappearing. The backup copies we make of our device connected to the Mac they include each and every one of the crenellated data on the device.
If our team is powered by maOS 10.14 Mojave or earlier, we must perform the following steps.

- We connect our device to the computer and open iTunes.
- The message will be displayed Trust this computer? on the device, by answering Yes, both devices will be able to communicate with each other.
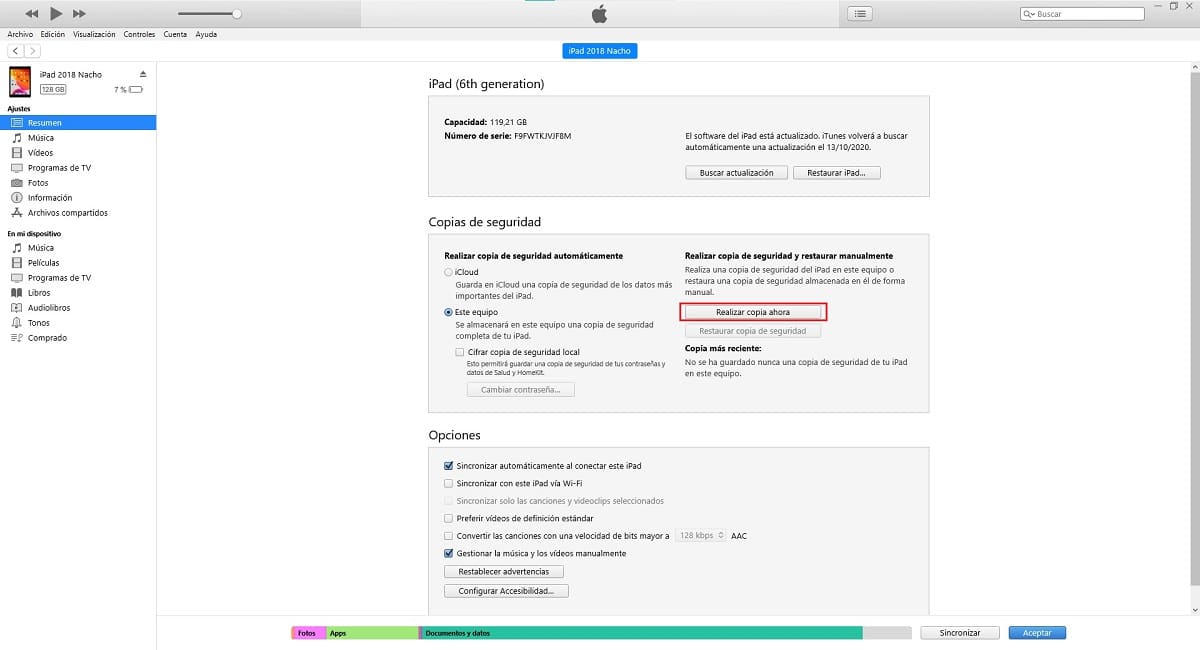
- Then click on the connected device and General Information.
- In the lower right part, we must click on Back up now. If the space occupied on the device from which we want to make the copy is very high, the time it will take will be long. The good thing is that while the backup is taking place, the device also charges.
If our team is managed by maOS 10.15 Catalina or higher, we must perform the following steps.

- Once we have connected your iPhone, iPad, or iPod touch to your computer, the message Trust this computer? on the device, by answering Yes, both devices will be able to communicate with each other.
- Then we go to the Finder and click on the device that we have connected.
- In the right column, the software version that we have installed will be displayed. Just below, in the Backups section, we must click on Back up now.
Windows
The process to back up all the content stored on an iPhone, iPad or iPod touch is the same as on a Mac with macOS 10.14 Mojave or earlier, as it is done solely and exclusively through iTunes by performing the following steps :
- We connect our device to the computer and open iTunes.
- The message will be displayed Trust this computer? on the device, by answering Yes, both devices will be able to communicate with each other.
- Next, click on the connected device and General Information to access the details of the device.
- In the lower right part, we must click on Back up now. The process will take more or less time depending on the space we are using on the device.