
Virtual desktops are a fantastic tool to better organize our work with the computer in different contexts. In a new version of Microsoft's operating system, you can create as many as you need. In this post we will see how to switch desktop windows 11 for each specific use that we are going to give our computer.
Basically this is a function that already existed in the previous version of Windows, but has now been improved, like so many others (see Windows 10 vs Windows 11: main differences). We will analyze all this below:
Virtual desktops: what are they?
We all know very well what the Windows interface is like: the main screen, flat or with a background image. On it, the overlapping icons of different files and programs. Is what we call desk.
When we work with many applications at the same time, that desktop becomes chaotic and cluttered. Insufficient for what we want to do. To answer this problem, Windows devised a virtual desktop system. It's about power manage multiple desktops, each of them with certain open or available applications. For example: we can have a desk to work, another for leisure, another with our personal tools, etc.
Ultimately, it is about being able to have different contexts in which to locate and organize programs and applications. It can be said that the idea is the same as that of creating different groups of tabs in our, although taken to the scope of the operating system.
How to add a virtual desktop in Windows 11
How to add a virtual desktop in Windows 11
Let's see what to do to start create different virtual desktops in Windows 11, thus configuring different environments to use our computer. These are the steps to follow:
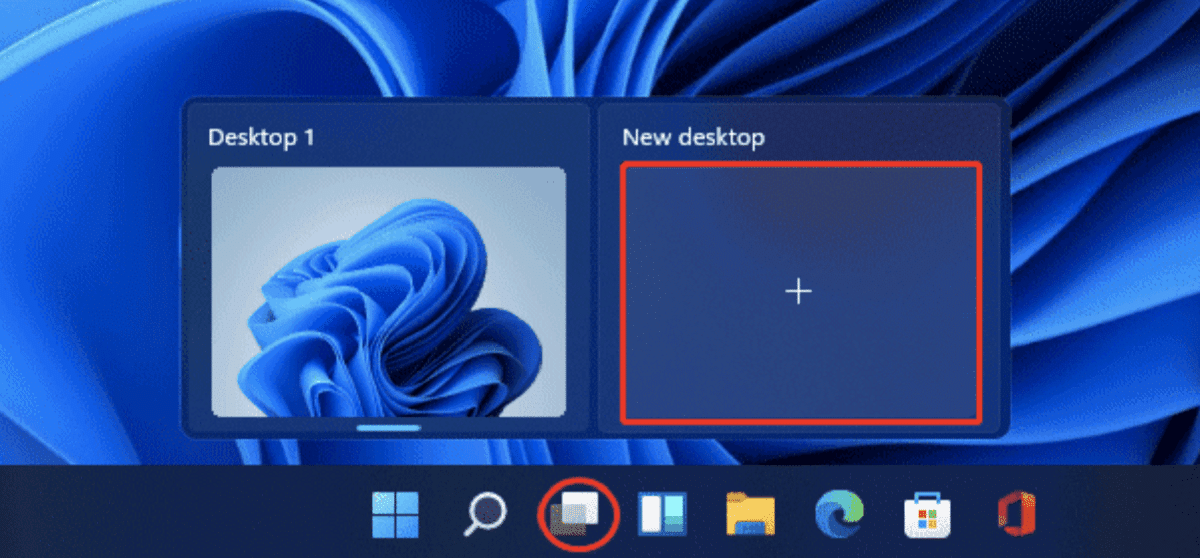
- First we hover the mouse over the task view button on the taskbar (it's the button right between the Widgets and Search icons, as shown in the image above). You can also use the Windows + Tab key combination to access this option.
- In the menu that appears, just click on «Add desktop» in the menu below.
The operation must be repeated each time we want to create a new desktop. And we can add as many as we need, there are no limits. Once generated, we have the possibility of design a specific work environment for each of them. For example, we can add individualized desks for different projects you are working on.
To get a quick view of what is on each virtual desktop on our computer, just move the mouse cursor over the "Task View" button and then over each desktop that appears in the pop-up menu.
Name and customize desktops
Each new desktop created will by default receive a generic name from Windows. However, there is the option of assign specific names to our new desks. That way we will organize ourselves better. To rename the desktops, do the following:
- We hover the mouse cursor over the button in the task view.
- Then we right-click on the chosen desktop and select the "Rename" option.
- Next, we write the name with which we want to call the desktop.
In addition to naming the new desktops, Windows 11 offers us the possibility of put a different wallpaper on each one, in order to differentiate them better. The idea is that they don't all look the same to us.
To change the aesthetics of the desktop, click the right button on the desktop wallpaper. In the menu that appears, you have to choose the "Personalization" option where we can choose a specific (and appropriate) wallpaper for that specific desktop.
Work with multiple desktops in Windows 11
Now that we know how to generate new desktops, it is time to answer the question of how to change the desktop in Windows 11. And not only that, but also to discover the functionalities and advantages that this feature of the latest version of the operating system offers us.
Sort virtual desktops
How to switch desktop in Windows 11
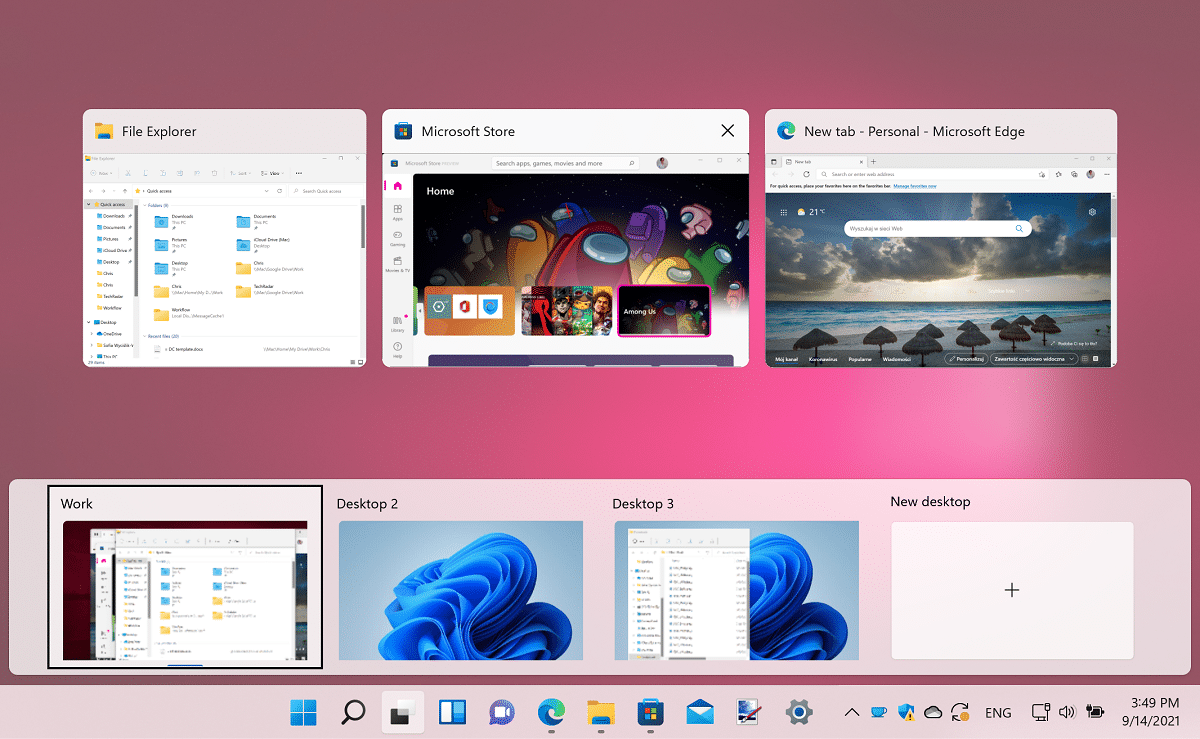
The Windows 11 virtual desktop display screen is very practical and easy to use. If we want to order the different desktops created, this screen can be accessed with the keyboard combination Windows + Tab.
Once the screen opens, we can drag with the mouse the desktops that appear in the lower list, as well as changing their order in the same way that we move and order the tabs of a browser. That easy.
Move applications from one desktop to another
A really practical function when working in multitasking mode. To move applications from one desktop to another, in the lower list of the desktop viewer you have to move the mouse over the desktop where the application to be moved is located. At the top are all the windows open there, which we can drag with the mouse to any other desktop in the list.
Switch desktops quickly
The desktop display screen is a very agile tool. For example, it allows us to navigate through them, moving from one side to another, from left to right, without having to open them. There are two simple keyboard shortcuts that we can use for this:
- Windows key + Control + Right arrow to move to the virtual desktop on the right.
- Windows key + Control + Left arrow to move to the virtual desktop on the left.
Close a virtual desktop in Windows 11
How to switch desktop Windows 11: Close a virtual desktop
If the task for which it was conceived has already finished or we suddenly realize that we do not need a specific desktop, we can choose to delete it without problems. For permanently close a virtual desktop and remove it from our desktop menu, we must follow a method similar to that used to close a browser window. The steps are simple:
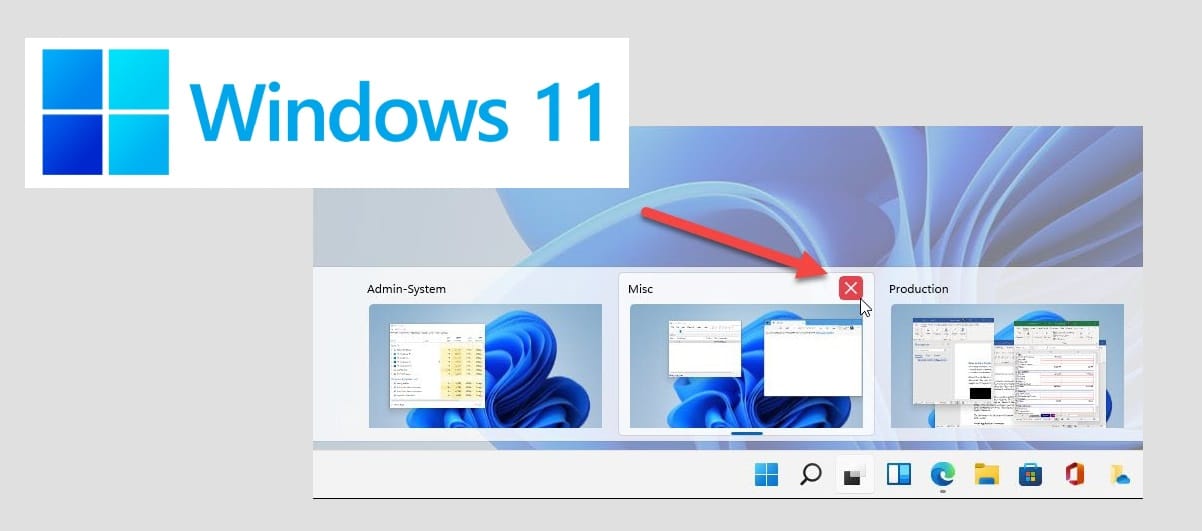
- To start we click on the button in the task view.
- Then we pass the mouse over the desktop that we want to close.
- Finally we click on the "X" in the upper right corner of the preview.
Another more direct way to close a virtual desktop in Windows 11 is to right-click the thumbnail of the virtual desktop preview and then click the "Close" button. There is also a third way to do it: using the combination Windows+Ctrl+F4 on our keyboard.
When you close a virtual desktop, its content will automatically move to the desktop immediately to its left. In any case, closing a desktop does not entail closing the applications that are open on it, but rather their transfer elsewhere.
Conclusion
We must applaud everything that the virtual desktop function incorporated in the new Windows 11 brings us. Without a doubt, and despite the fact that there are many aspects that can still be polished more, offers a smoother, more practical and intuitive experience than the one that Windows 10 had given us up to now. A magnificent solution to create different environments appropriate to each of the various tasks and uses of our computer.