
Anyone who has already used the Google calendar knows well the organizational advantages of having an electronic calendar and calendar, both for professional and private use. The most practical thing is undoubtedly to have Google Calendar on desktop from our computer, to get the best performance and have all our plans and appointments just a click away.
For those who still do not know, Google Calendar was developed in 2006 and presented in 2009 as a perfectly functional finished product. Its interface is similar to other desktop calendar utilities such as iCal (for Mac OS X) or Microsoft Outlook. Among its main functionalities, the possibility of synchronizing it with Gmail contacts stands out.
Google Calendar: how to get it?
The Google calendar is installed by default in all versions of the Windows operating system. That's why accessing Google Calendar and starting to organize our time and activities is very simple. In case it isn't, it can be downloaded for free from the Chrome Web Store.
How to use and install Google Calendar on the desktop
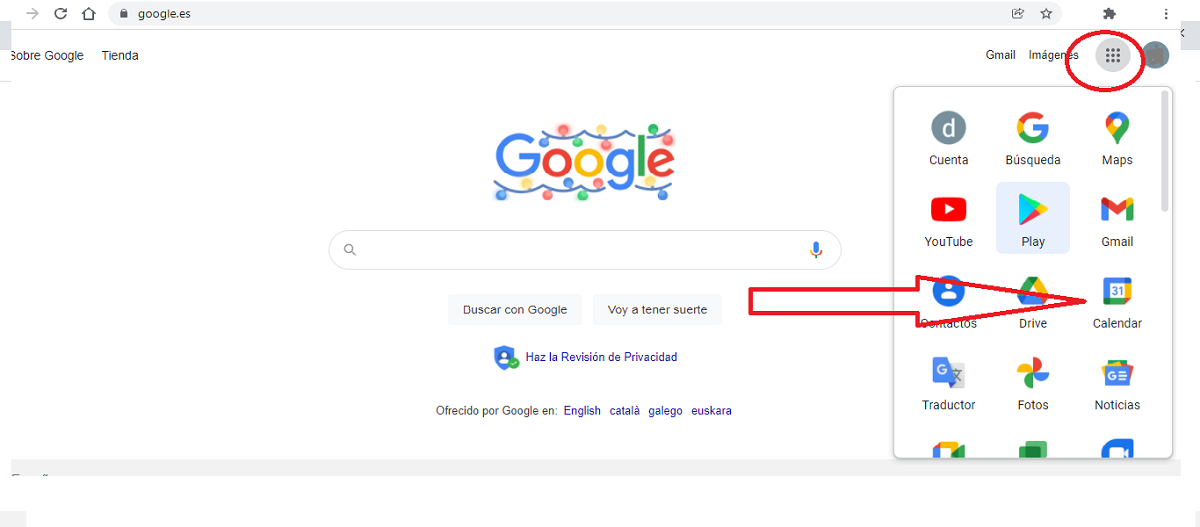
If we already have a google account, first you have to access it. If we don't have one yet, we have to create it. Thus, when entering the Google website, you have to go to the upper right corner and click on the applications icon (as shown in the image above). In the drop-down that opens below, you just have to select the Google Calendar icon.
Google Calendar works with the current and previous major versions of the following browsers: Google Chrome, Microsoft Edge, Firefox and Safari.
Create a new calendar
Google allows us create as many calendars as we want. In this way we can keep track of different types of events: professional commitments, our children's agenda, medical appointments, etc. To create and configure a new calendar, these are the steps to follow:
- On the computer we open the Google Calendar.
- On the left, next to «Other calendars», we click on «Add other calendars More» and then in «Create calendar».
- Then we add a name and a description for the new calendar.
- Finally, you have to click «Create calendar».
Share and edit calendars
Calendars can be cShare with other users, which is very practical in certain cases. For example, in a work group. To do this, click on the calendar icon in the left bar and then select "Share with specific people".
For edit the name and appearance of a calendar You have to access "My calendars" and select the one you want to modify. Then we go to "More options", then to "Settings and sharing" and in the box that appears at the top, we change the name or choose a new color.
Synchronization of Google Calendar with Windows Calendar
The easiest way to get your Google Calendar information is by syncing it with your Windows Calendar. In this way, all appointments and annotations can be accessed from the operating system itself. The steps to synchronize both calendars are very simple:
- In the Start menu of the computer, we write calendar and in the results we select the application "Calendar".
- We open the application and select the icon of the cogwheel or gear that is located in the lower left part. This is how we access the setup menu.
- Then we select "Manage accounts" and then «Add account».
Install Google Calendar on the desktop

How to install Google Calendar on the desktop
The first thing we should do before putting Google Calendar on the desktop is to make sure that our browser Google Chrome is up to date in its latest version. That will avoid many malfunctions. Once this is done, we follow the following steps:
- To begin with, we enter Chrome Web Store.
- In the search bar, we write the name of the extension: Google Calendar.
- In the list of results that is displayed, we select the extension and click on the option "Add to Chrome".
- A pop-up window will appear. In it we select "Add extension". Doing so will start the download and installation automatically.
- When the installation is complete, Google Calendar will appear on the desktop in a separate window.
- Finally, we click with the right mouse button on the Google Calendar icon and select "Pin to taskbar."
Can it be used on a Mac desktop?
Install Google Calendar on a Mac desktop
If instead of Windows we are users of the iOS operating system, we can also use the Google Calendar and install it on our desktop. The most important thing, to make everything easier and more fluid, is having previously linked our Google account to our Mac. This is how we can check it:
- First of all, we go to "System Preferences".
- From there we select the option "Internet accounts".
- In the list that appears we can see which accounts are synchronized on our Mac.
If the account is already linked, there will be no problem starting the account sync. The process is the same as we have explained above. However, we must not forget that in order to make use of it, it will have to be configured first.
Even so, and despite having the same functions, it is important to know that we will not be able to link Google Calendar with Apple Calendar, since their software is different and totally incompatible. This may seem like a problem, but many users adapt perfectly to this situation and manage both calendars without conflict, separating the purposes of each of them on their Mac.
How to use Google Calendar
Managing this calendar is very simple and offers many practical advantages, especially if we have Google Calendar on the desktop. Here are some basic instructions to use and get the most out of it:
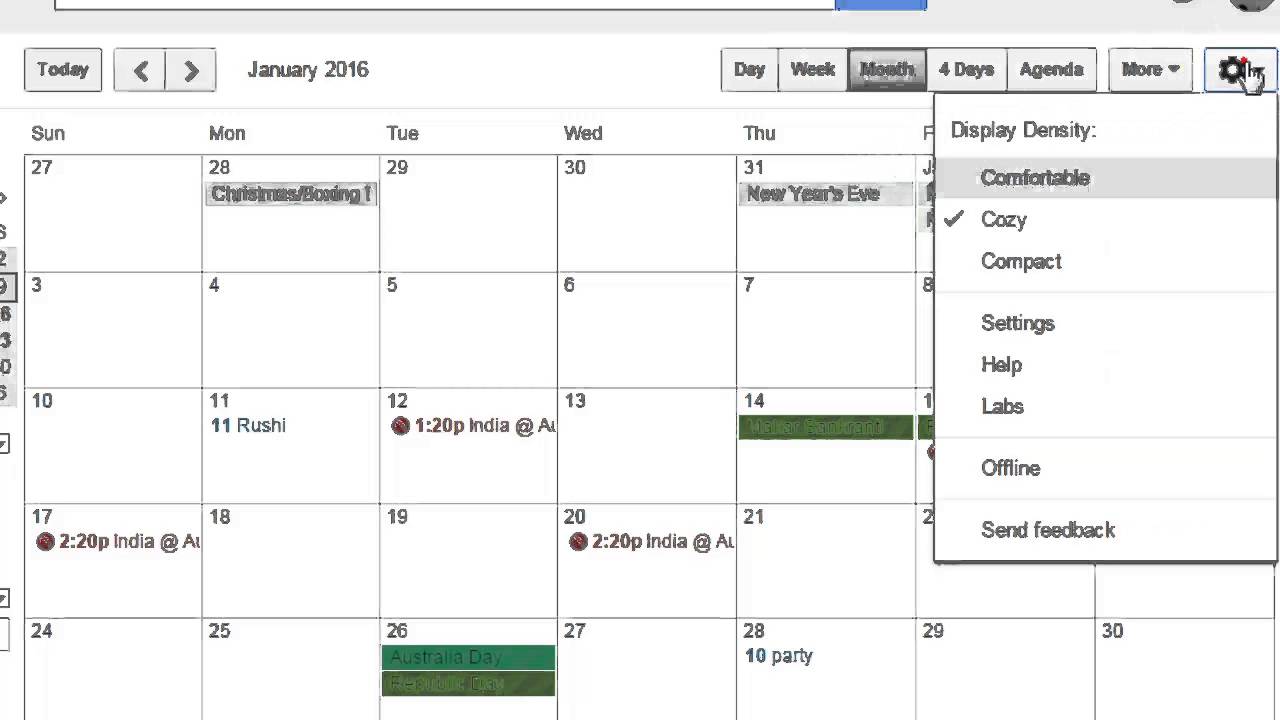
Monthly view of Google calendar
Calendar view
The default view of Google Calendar is the most visually simple, although it can be modified to suit our own taste. If we work with several calendars at the same time, it is a good thing to differentiate them with different view modes.
In the upper right corner of Google Calendar we find the display options: Day, Week, Month, Year, Agenda or 4 days.
Browse the calendar
If we use Google Calendar on the computer desktop, there are two ways to move from one date to another:
- Using the arrows in the upper left corner of the calendar.
- Through the miniature calendar which is in the upper left corner.
On a smartphone (either Android or iOS) the navigation is somewhat different, although we will also find the options in the upper left corner of the screen.
Create and edit events
To create an event or mark a date on our calendar, proceed as follows:
- In the upper right corner we select the option "Create".
- There we write the title, date and time of the event, for example: meeting.
- To invite another user to our event, we select "Add a person to the meeting" and we write your email address. Thus, you will receive an invitation in your inbox.
- To finish, we click on "Save".
To delete or edit the event we go to the first step of the previous list, but selecting the corresponding option. The same for searching for events.
Print calendars
Sometimes it can be practical to print calendars on paper or save them in PDF format so that they can be viewed by others without having to share all your information. This is how you do it:
- In the upper right corner, choose an option to select a specific period of the calendar (day, week, month, year ...)
- Then we click on "Settings" and then "To print".
- In the window "Print preview" We can change some details such as the size or the color of the font.
- Finally, we click on "To print".
Work offline
With the function of offline calendars, we can access ours even when we are not connected to the Internet. This is particularly useful in locations where connections are weak or insecure.
There are certain functions of Google Calendar that can be performed without being connected to the network, such as consulting or viewing events. For this you just have to do the following:
- We open the Google Calendar.
- In the upper right corner, we click on the menu "Setting".
- On the left, in the tab "General", we select the option "Without connection" and then that of "Activate offline calendar".
Once this is done, the calendar is ready to be used offline. In the upper right corner of the calendar, we will find the option "Sync up". When we are going to use it, the notice of «It seems that you have no connection. You may not be able to perform some actions.
When using offline calendars, it is important to note that the data will be synchronized since the last time our computer was online. We will also not be able to create or edit events, send invitations as well as access tasks and reminders.