
Discover the ways to delete friend requests on facebook, whether you are the one who sent them or simply receive them. In this note we will tell you the methods that exist to avoid becoming friends with a user that you do not want or simply that you invited by mistake.
We all know the popular platform Facebook, one of the most popular social networks and that is still valid. This has taken on a new life thanks to the absorption of Meta into other popular projects such as WhatsApp or Instagram.
To enjoy the content of other users, Facebook requires that there is a friendship relationship on the platform, which is achieved through invitations or friend requests. The same can be done by both parties and their counterpart must accept or deny the request.
How to delete friend requests on Facebook

It may happen that not all requests received or sent are well received, so many of these are eliminated and avoiding making the friendship link between both users. Here I will tell you how to delete friend requests on Facebook, regardless of whether it was sent by mistake or you simply do not want to accept it.
Method to delete friend requests received on Facebook
Actually, this is very simple, thanks to the fact that the engineers who have developed the platform, seek to facilitate processes, especially the main ones, such as friend requests. In case you don't want to be a friend within the platform of a user who sent you an invitation, then you can easily remove it as follows:
- Enter the platform Facebook. If you are not logged in, you will need to add your credentials, such as email, phone number, and password.
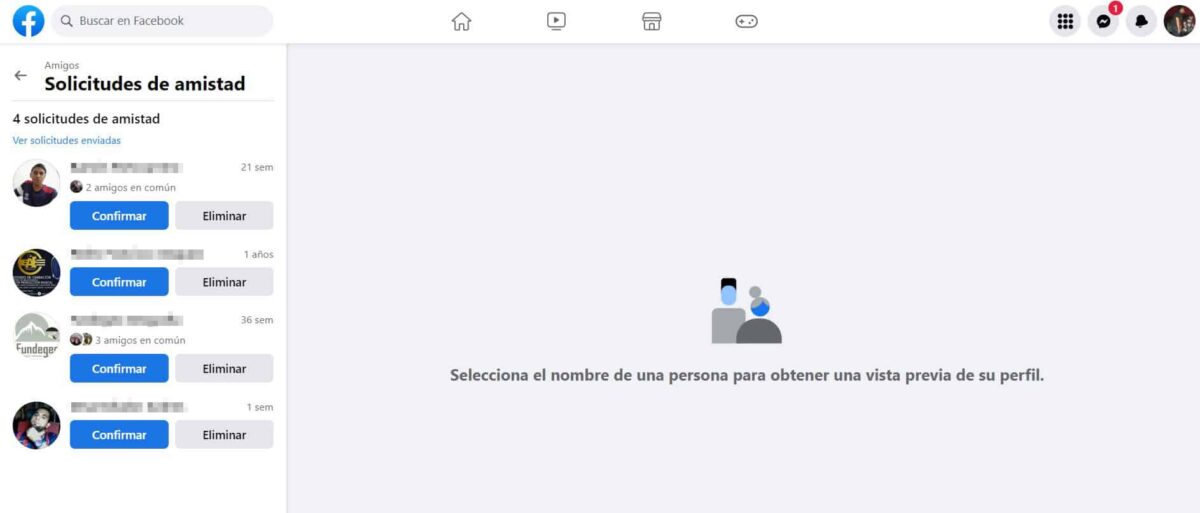
- Once inside, you will be able to see publications from pages and other users, being of interest in this opportunity the left column, where we will look for "Friends”. Here will appear not only your friends, but the requests you have pending.

- Initially, the pending friend requests will appear, in case it is not the case or you have many, you can simply click on the option “See all”, located in the upper right corner or in “Friend requests”, in the left column.

- To eliminate each of these requests, you can click on the button “Delete”, which is located under the option of “Confirm".


It is important that you know that when you delete a request, the user who sent it to you will not receive any notification, but he can send you a new one at any time. Possibly, after deleting this, your profile will appear among those of people you may know, Facebook suggestion to add as friends.
When you don't want to add as a friend a user who sent you a request, but you don't want them to do it again either, you have two options, one is to block that profile, which will not be able to interact anymore until you decide to revoke the block.
The second option, and possibly one of the most used by most users who do not want to accept a request, is to leave it there, avoiding clicking on the “Confirm" or "Delete”. This will leave the request there, without any effect, and therefore, whoever sends it, will not find out either.

Method to cancel friend requests sent on Facebook
In case you have sent mistaken friend request or you just regretted it after doing it, don't worry, there is a way to reverse this case, as long as the other user has not already accepted. The way to do it is:
- Enter with your credentials to the official site of Facebook.

- Once you can see the content, you must go to the left column and locate the option “Friends”, where, as in the previous section, we will click.
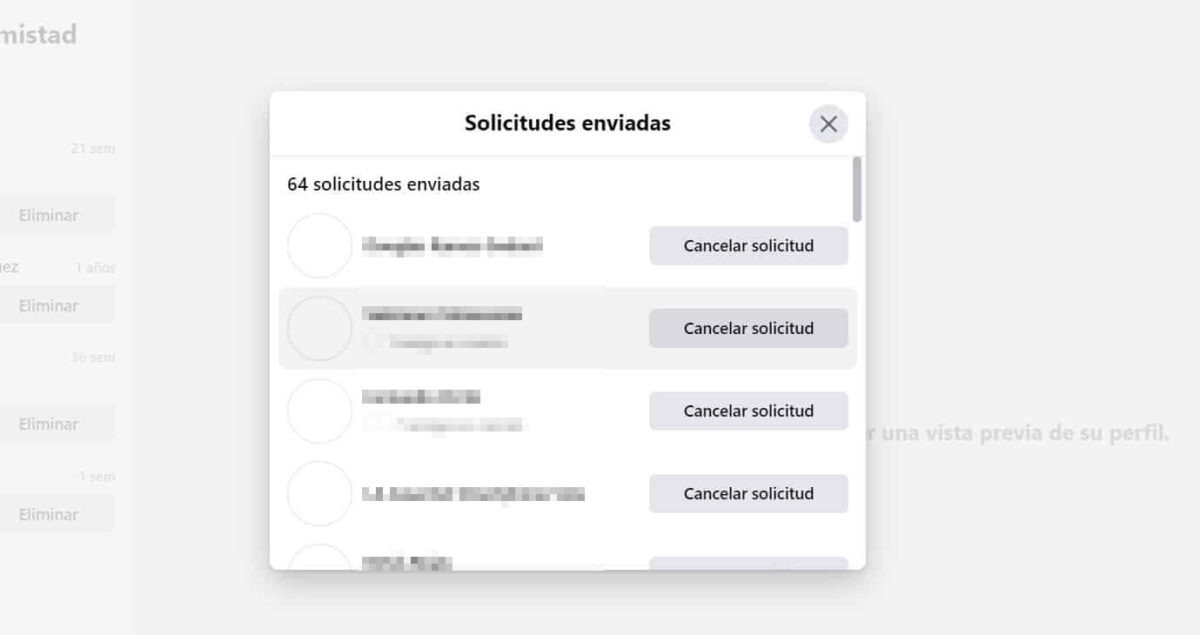
- Again, in the left column, find “Friend requests”. Both sent and received will appear here, only they will not be seen directly. Initially, you will find the received ones arranged in a column and you will also be able to see a small link that says “View submitted requests”, we must click on it.

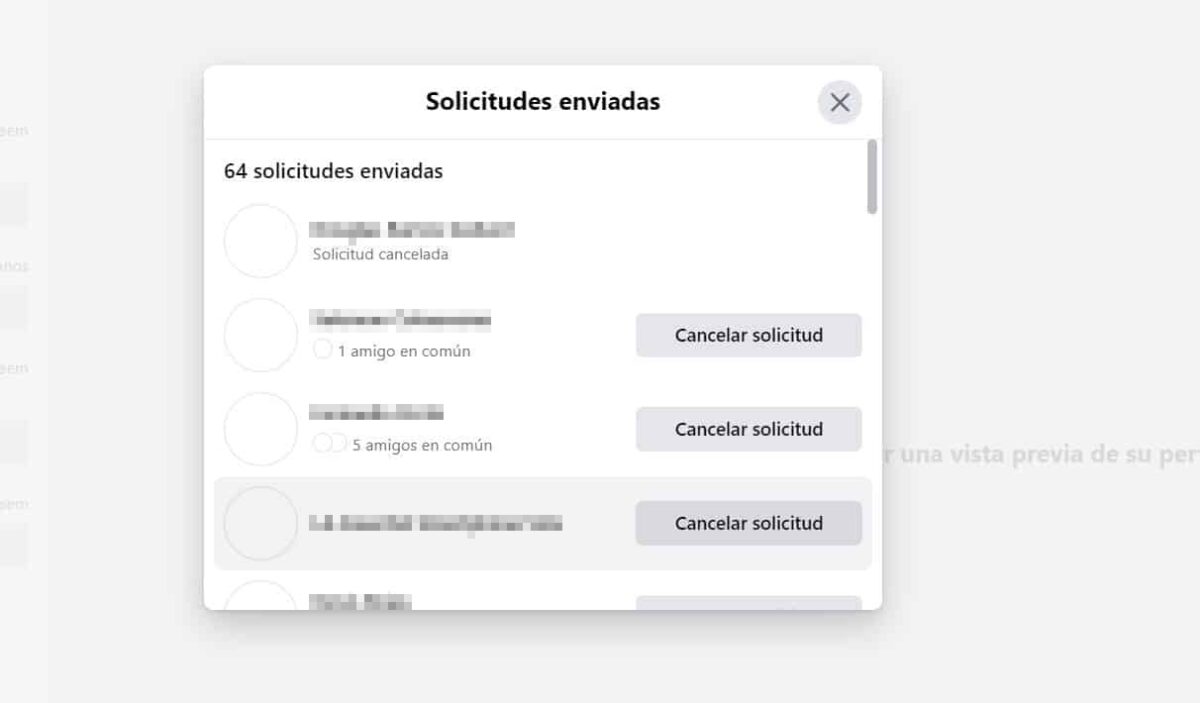
- A pop-up screen will show you all the requests sent and on the right side of each one, you will be able to see a button that indicates “Cancel request".

- After we click on it, a message will appear below the user's name, telling us that we have successfully canceled the request.


As you can see, this method is very easy to execute, so I'm sure you won't have any problems when you do it yourself. Perhaps the only tedious thing, both in the deletion of received and sent requests, is that we must do manually one by one. For this reason, I recommend that if you want to eliminate them, do not let them accumulate, because the work will seem endless.
I hope I have helped you, we will read another time. If you have any questions or comments, you can leave it in the comments.