
Use a connection HDMI It is an excellent, safe and quality option when connecting different devices, especially a laptop with a television. However, on some occasions we encounter errors. When the HDMI connection does not work in Windows 10 there can be many reasons. In this post we will talk about these problems and also their solutions.
But before we get to the point, let's do a brief review of what is HDMI and what is it for.
HDMI stands for HDMI, that is, High Definition Multimedia Interface. It works through a cable (the famous HDMI cable) which allows us to connect different devices and transmit high definition video and HD audio content in a unified way.
It is a successful invention of the greats of the technology and entertainment industry: Panasonic, Philips, Sony, Toshiba, Disney, Fox, Universal, Warner Bros.… All of them agreed to create HDMI back in 2002.
Thanks to the HDMI cable, we can connect, for example, a Blu-Ray player to a Home Cinema device, without the quality being affected in the least. With HDMI we can also connect our laptop to a TV or a modern console to a television or monitor. The possibilities are endless and the optimal result
The quality of HDMI has been improving remarkably since its launch to the present day. But that does not mean that it is exempt from errors, as we will see below.
Why is HDMI connection not working in Windows 10?
An HDMI connection failure with our computer may have different causes. It can be, for example, a physical error, from a wear on the HDMI port or a defective cable. It can also happen that the malfunction is due to a failure of the graphics controller, or perhaps a device display configuration problem. In reality, the reasons can be numerous.
In any case, the most common is that this connection error manifests itself in these three ways, exposed from less to more:
- An audio or video does not work through your HDMI connection.
- The content that is transmitted via HDMI does not play properly.
- HDMI doesn't work at all.
¿Qué se puede hacer? The method to satisfactorily solve the problem depends on each house and, above all, on where the source of the error is located. Below we detail each of these solutions:
Solutions for HDMI connection errors and Windows 10
Classified from the most basic to the most complex, we offer you a series of solutions to the problem of "HDMI connection does not work in Windows 10". Try each one of them until you get the result you are looking for:
Hardware verification
Often times the error is fixed simply by changing the HDMI cable
One of the most common reasons for this connection problem is a simple hardware error. Anything that is damaged or corrupted can interfere with the connection, hindering or interrupting it. For this reason, before exploring other solutions, it is advisable to proceed with a hardware check:
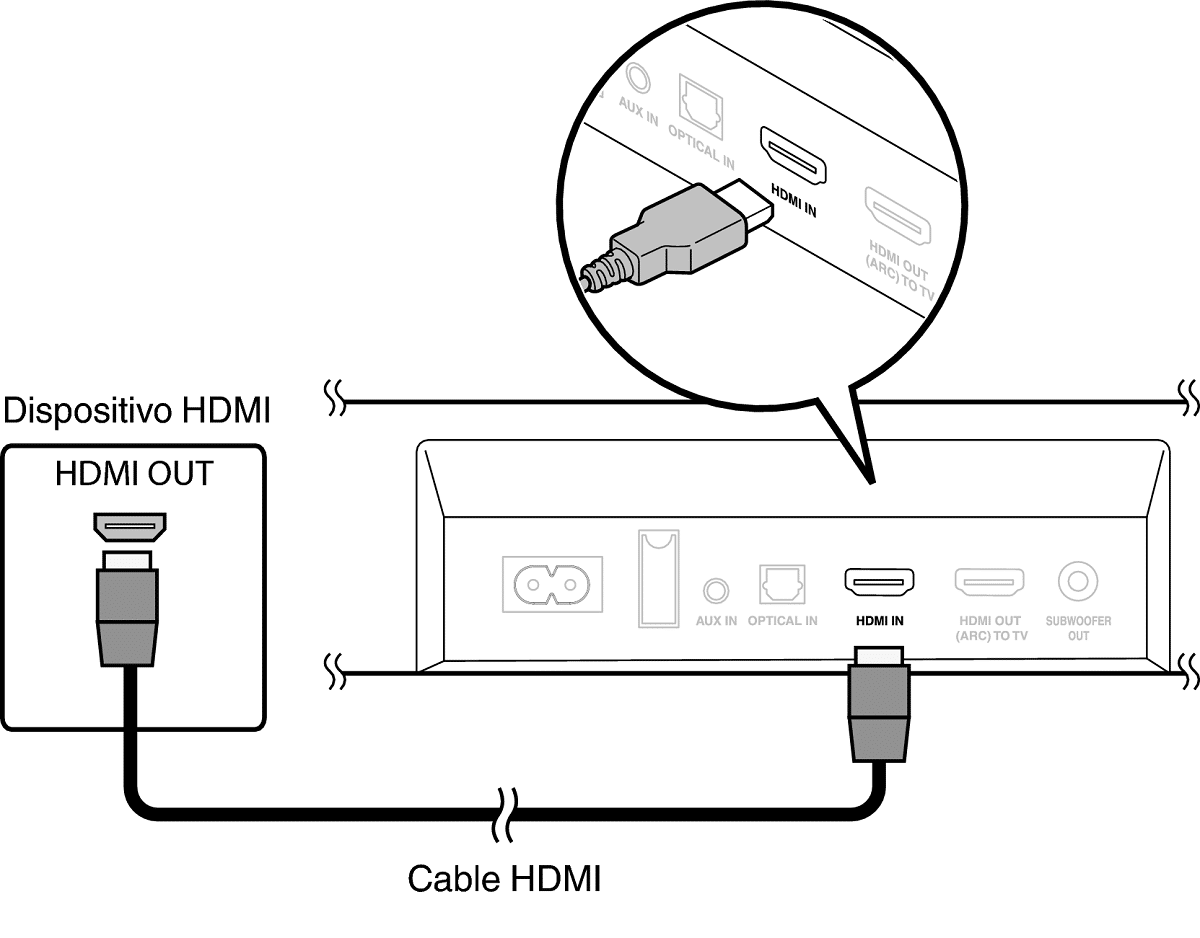
- HDMI cable. It happens quite often that the HDMI cable is damaged. It can happen to be an old cable that has been used many times and has ended up breaking or wearing out, especially in the plug or connector. However, we can also find this problem with a newly purchased new cable that has been defective from the factory.
- HDMI port. It is important to verify that the HDMI ports (both input and output) of your computer and your devices are in good condition. That they are not damaged and that they work correctly. Along with the cable problem, it is one of the most common causes of this type of connection failure.
In these cases, the solution is simple: change the cable (that is, buy a new one) or replace the faulty USB port. This is a simple repair that doesn't have to be too expensive.
Restart and reconnect
Connect, restart and disconnect. You have to try this method before if the HDMI connection does not work in Windows 10
Another obvious solution, but one that is always worth remembering. How many problems have been easily solved with a simple reboot! In addition, it never hurts to resort to this solution for two reasons: it is very simple and will help us, in the worst case, to rule out other reasons.
And it is that in many of the occasions in which HDMI does not work, everything is due to a incorrect startup of connected devices. Oddly enough, starting a computer improperly can cause an error.
The solution is to follow these steps:
- Disconnect devices (PC, TV, speaker or whatever we want to use).
- Restart them individually, giving everyone their time and avoiding mistakes. This will update the connection systems that have failed before.
- Reconnect them via HDMI.
It is very likely that only by doing this the question has been definitively solved.
HDMI as default device
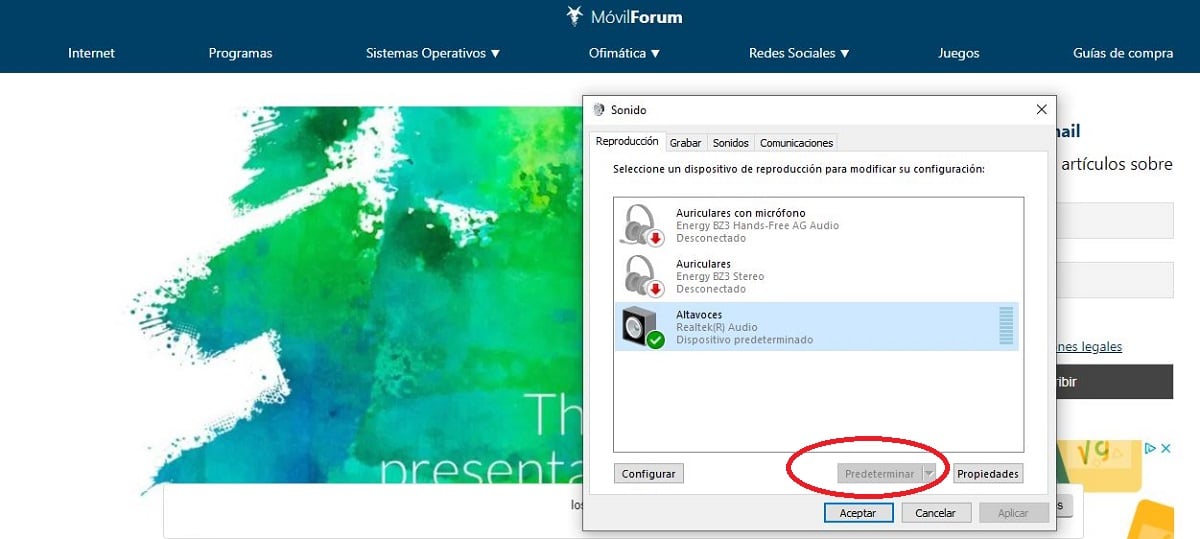
Set HDMI as the default device.
If we have tried the two previous methods and the problem persists, try this solution. What we will do is try to find out if our HDMI device is set as default or not. It is quite likely that an HDMI device will not work well if we do not have it configured as the default device for our Windows system.
If it is not, it will have to be configured as the default device. We explain how to do it in three quick steps:
- First of all we must go to the windows 10 start screen. There we right-click on it volume icon displayed on the taskbar.
- Then a small window will appear "Sound". There we click on the tab titled "Reproduction", where we will be shown a list with all the playback devices, including HDMI devices.
- Finally, we select the HDMI device that we want to set as the default. To finish the process, we first click on "Predetermine" and then in "To accept".
After completing these three steps, the HDMI output device of our computer will be configured as the default HDMI device for the Windows 10 system.
Remove recently installed software
Solutions to HDMI not working in Windows 10
What if the HDMI connection failure that bothers you is occurring since you performed the last software installation on your computer? If so, you most likely already know where the error originates. What usually happens in these cases is that the recently installed program contains errors. Or maybe it is directly incompatible with your system.
Luckily, the solution to this is very simple: you have to uninstall that software. We explain how it is done in three steps:
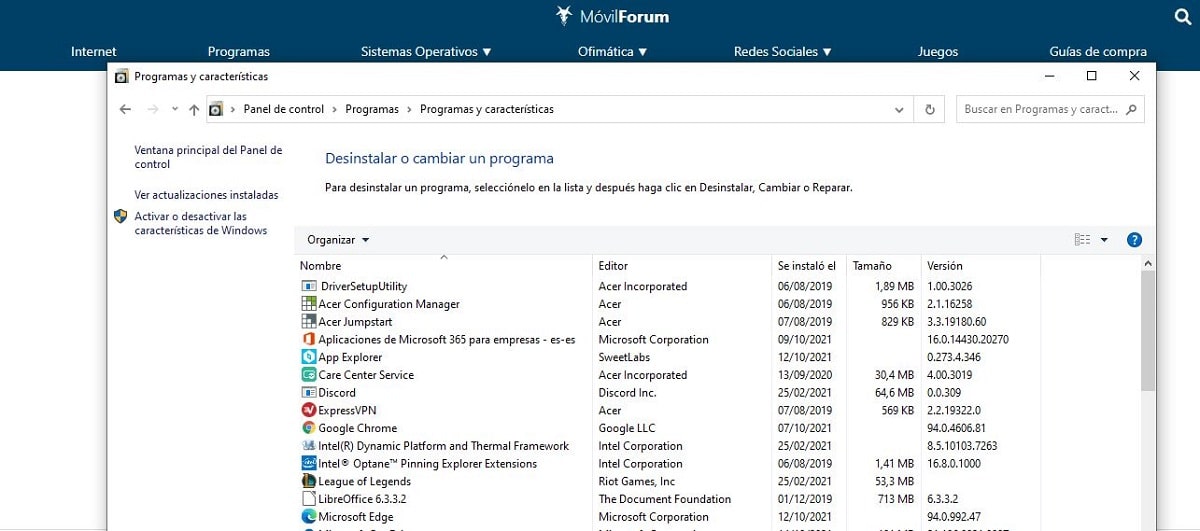
- To start you have to go to the Windows 10 system startup screen. There we go directly to the search bar and write "Control Panel".
- Once in the Control Panel window, we look for the option «Programs». Within it, we select the option "Uninstall a program". A long list with all the programs installed on our Windows 10 system will appear on the screen.
- Finally, we access the window "Programs and characteristics" and we will look for the recently installed software, the one that is causing the problem. Simply right-click on the icon of the recently installed software and choose the option "Uninstall".
Remember that to check the result of this operation you have to Restart your computer for all changes to take effect and then try to establish the HDMI connection.
Update the graphics control
Update the graphics drivers of our computer to solve HDMI connection problems
If the HDMI connection problem is due to poor image display, the action may be needed in the graphics control. Any small mismatch can cause major errors in data communication between the HDMI device and our system.
The alternatives we have to remedy this situation are two: update the graphics control or directly reinstall it from scratch. For the update we must proceed as follows:
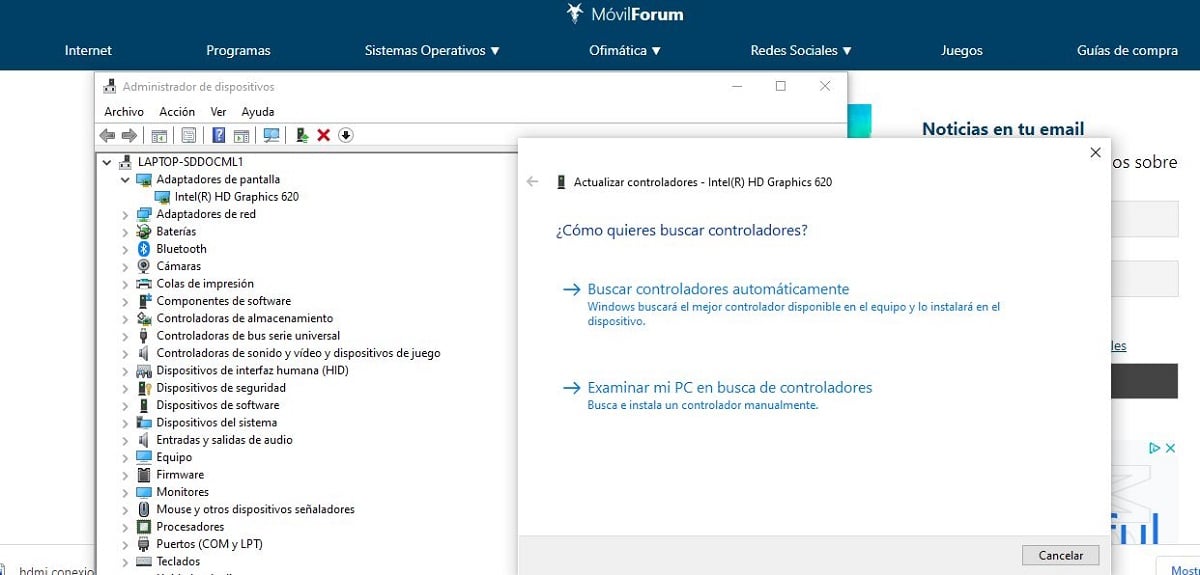
- First of all we go to the start screen of our computer, we open the search panel in the taskbar and we search "Device administrator".
- We click on it and a list with all the input and output devices will appear on the screen, as well as other devices and components necessary for the proper functioning of the Windows 10 system.
- Finally we go to the option "Display adapters" and we click on the arrow that appears. So we can see our graphic device. We right-click on it and choose the option "Update drivers". Then, you just have to follow the instructions to complete the update.
As you can see, HDMI connection problems are in most cases quite easy to solve. It is simply a matter of locating the origin of the problem, which is not too complicated, and applying the most convenient solution.