
During these days we are teaching you how to capture screen on iOS, on Android, on a Chromebook. And of course, I needed to teach you how to take screenshots on a Mac. Apple is not only recognized worldwide for its famous iPhone, but also has a very interesting line of computers -laptops and desktops. With a price above the average, but which enjoys an operating system that attracts the attention of users.
It will be as good if you have an Apple laptop as a desktop computer. In both cases you must resort to the same key combinations to take the different screenshots, whether they are complete, partial, of a specific window, of the Touch Bar, etc. Next we will leave you with all the methods to carry out this action on your Mac.
The sale of Apple computers fell in the last quarter of 2022

We have to tell you that, although Apple is very popular, in its computer section sales are not like those we can find in the iPhone, which, every 10 mobiles sold, 8 are an iPhone. In the computer industry the leader is Lenovo, followed by HP, Dell and Acer. That is, sales have fallen in the last quarter of last year. And his Apple lost its fourth place with a 20 percent drop in sales.
Even so, this sounds so catastrophic, Apple has slowed down but it does not stop placing computers all over the world. And that is why one of the most widespread functions among the public is to take screenshots to share them later. These captures can be messages received, bank statements or images that we can save. Well, Macs allow this action and we are going to show you how to do it.
Take screenshots on Mac – key combination
As we have already mentioned, taking screenshots can go well in many cases. It can get to the extreme that for fear that a conversation through an instant messaging service will be deleted -by mistake or not- and you need the information that is reflected there. Therefore, continue with the following combinations that we are going to show you. Of course, you should keep in mind that this will work for computers that have the version of the operating system MacOS Mojave 10.14 onwards.
To launch the 'Screenshot' application that comes installed by default in the operating system of your Mac, you must do the following:
What you will see next is the application menu with different icons. Each of them has a mission, but it is better that you study them with the image that we leave you below. At the top you will see the floating menu that appears after the key combination and below the explanation of each of the icons that appears.
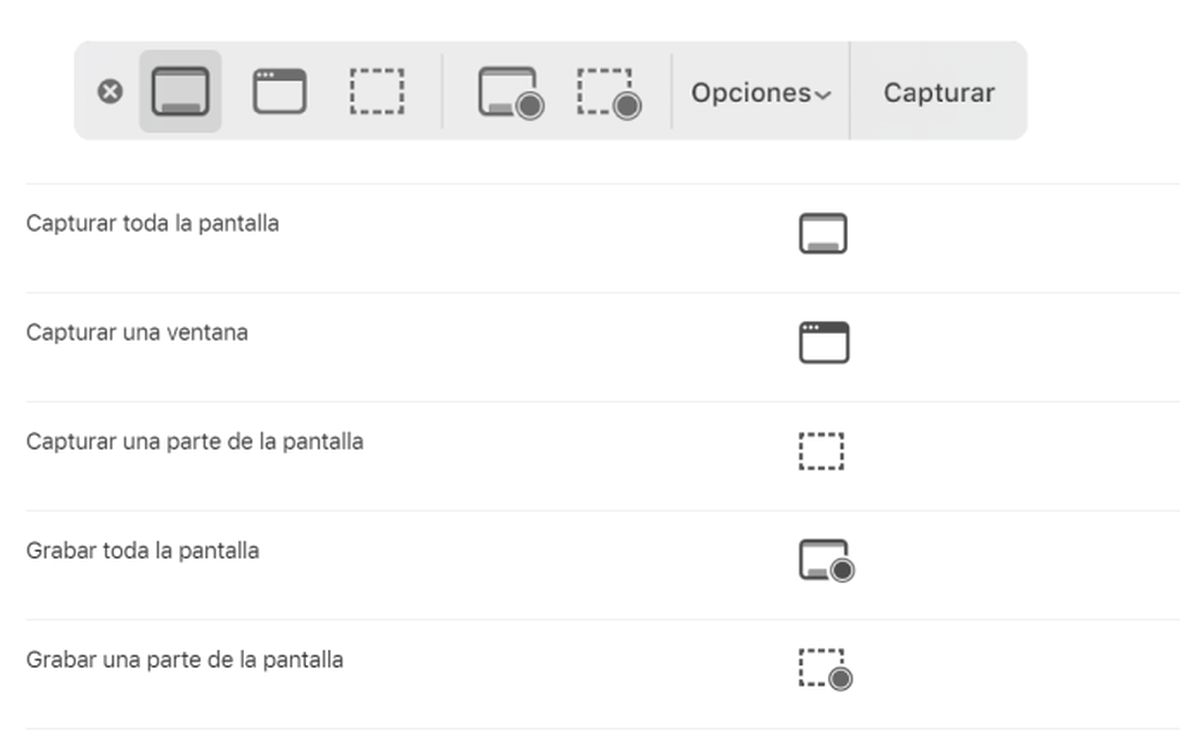
Apple Image
Similarly, the 'Screenshot' application on Mac can be launched using the above key combination or directly using the Launchpad. To enter it, you just have to click on the rocket-shaped Dock icon. There you will see all the applications installed on your computer. It's more, its appearance with large icons is quite reminiscent of iOS on the iPhone.
Taking screenshots on Mac without the 'Screenshot' app – available hotkeys
If launching applications is not your thing and you are one of those who like to touch the keyboard, you should know that all forms of screenshots can be invoked by means of key combinations. It's more, this is what was previously done in operating system versions macOS High Sierra and earlier. The combinations are the following:
Key combination to capture the entire screen
Key combination to capture a part of the screen
Key combination to capture a window or the menu bar
Although then you must press the space bar and you will have to move the pointer to the menu or window that you want to highlight. Then click on the object.
Key combination to capture the Touch Bar

Some company laptops have another screen above the first row of keys that was named touch Bar. This screen, as its name indicates, is tactile and from it you can launch functions to your liking. Well, in case you want to capture an image of it, the key combination is as follows:
You can edit shortcuts on your Mac
Now, if these key combinations are difficult for you to remember, you also have the possibility to edit the shortcuts -or key combinations that are recorded by default-. To do this, you must go to the apple menu -upper left of the taskbar-, then click on 'System preferences' and search Keyboard>Quick Functions. In this section you can modify the existing combinations, as well as create new ones that are useful to you.
Where are screenshots saved on Mac
Screenshots you take on your Mac are usually downloaded, by default, on the desktop. You will identify them because they normally always come with a sequence in their name that is repeated in all of them. The name is usually:
In the 'Screenshot' app settings you can modify their destination once they are ready to be saved. In the same way, you can also make use of external applications to edit everything you need.
What else does the Screenshot app offer on your Mac?

In addition to creating images, the 'Screenshot' application It also allows you to make screen recordings.. This is very useful for those content creators who need to make small tutorials on some part of the Mac, as well as teach how certain applications work -the typical reviews of external applications.
To carry out these screen recordings, all you have to do is change what you want to do as the application's floating menu appears. That is, the last icon tells you if it is a capture or a recording. Choose the last one and the functions are the same as we have presented to you in the screenshots; ie: full, partial screenshot, etc.
Like the captured images, video captures will also be saved on the desktop under a common name in all of them: